
AI Powered 3D Human Shape Estimation

Everyone loves their 3D model
Create your own image-based digital 3D model using PIFuHD
Image-based AI-Powered 3D Human Shape Estimation
In this short tutorial, we are going to look at the very cool and interesting image-based 3D human shape estimation model. We are going to implement a pipeline on Spell workplace with a jupyter lab and run the pre-trained model to turn our custom image into a 3D model.
Signup for the Spell if you haven’t and you can get 10$ with GPU time on T4, P100, k80, and V100 GPUs for free.
Model Description
We are going to use Facebook research’s pifuhd model which contains a PyTorch implementation of “Multi-Level Pixel-Aligned Implicit Function for High-Resolution 3D Human Digitization”.
All the links to the paper and project GitHub repo are given below:
Paper: https://arxiv.org/pdf/2004.00452.pdf
Repo: https://github.com/facebookresearch/pifuhd
Project Page: https://shunsukesaito.github.io/PIFuHD/@inproceedings{saito2020pifuhd,title={PIFuHD: Multi-Level Pixel-Aligned Implicit Function for High-Resolution 3D Human Digitization},author={Saito, Shunsuke and Simon, Tomas and Saragih, Jason and Joo, Hanbyul},booktitle={CVPR},year={2020}}
Requirements
To run this project you will require the following python libraries:
- Python 3
- PyTorch tested on 1.4.0, 1.5.0
- JSON
- PIL
- skimage
- tqdm
- cv2
For visualization
- trimesh with pyembree
- PyOpenGL
- freeglut (use sudo apt-get install freeglut3-dev for ubuntu users)
- FFmpeg
Note: At least 8GB GPU memory is recommended to run the PIFuHD model. We can use any GPU from Spell.
Getting Started
As mentioned earlier, we are going to use the jupyter lab on Spell’s workspace. To get started with the jupyter lab, all we need to do is log in to the Spell we platform and head to the workplace tab.
Once we are on the workspaces page, we can create our new workspace with a suitable name and hit the CONTINUE button.
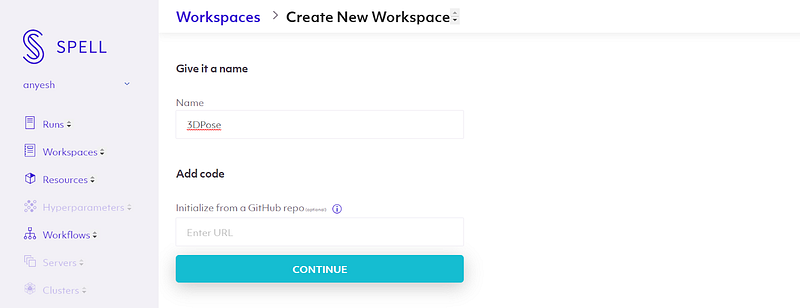
Now you will have a form to fill out other details of the Machine and any specific pip or apt requirements. We are going to use the Jupyter Lab as our notebook platform, the V100 GPU machine for our task, and the PyTorch framework. Other configurations we can leave to default, and we are going to list essential pip packages. Later if we require anything, we can install it later in the jupyter lab.
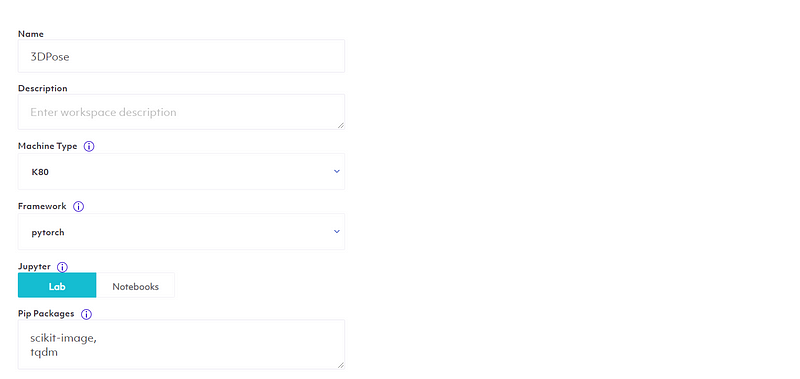
Now we can save to configurations and run our lab.
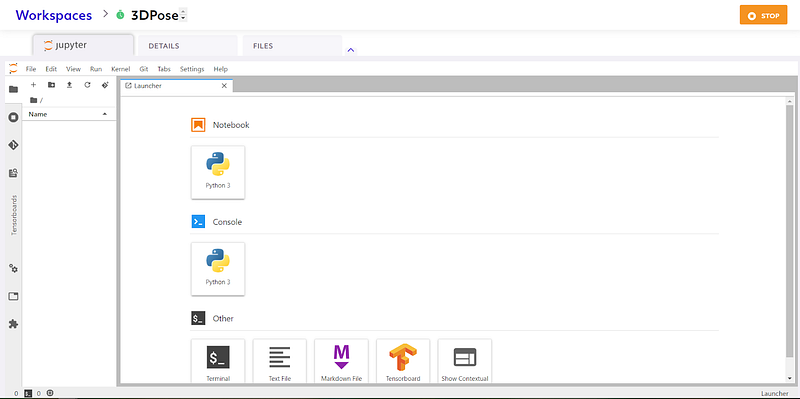
Jupyter Lab
Jupyter Lab on Spell is an awesome Lab for managing various different notebooks experiments. In Jupiter lab, we can not only work with our favorite Jupiter notebook, but also we can use command-line interfaces, and also we can run apt commands on code cells.
You can check out all the features and use it as your daily driver for trying out various ML and DL projects. You can use the CPU machine on Spell which is totally free to use.
Model Implementation
Now that we are in our lab, let’s experiment a few things.
We will create a python 3 notebook and clone the repo.
On our code cell, we can run the git clone command directly to clone the model.!git clone https://github.com/facebookresearch/pifuhd
The above command will clone the pifuhd repo on our lab.

Once the repo is cloned, you can see a folder appear on the explorer tab on the left side. This is the beauty of jupyter lab, we can use it as we are on our local machine with a high-powered GPU server.
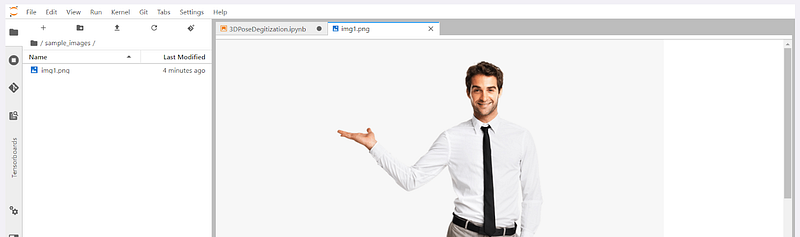
Now let’s create a folder on our root directory to store our sample images. We are going to name the folder `sample_image`.
Once our folder is ready, we can upload multiple sample images there.
We would require a high-resolution image of humans to reconstruct their 3D model.
There are a few tips from the authors mentioned below to get better results from this model.
- Use a high-res image. The model is trained with 1024x1024 images. Use at least 512x512 with fine details. Low-res images and JPEG artifacts may result in unsatisfactory results.
- Use an image with a single person. If the image contains multiple people, reconstruction quality is likely degraded.
- Front-facing with standing works best (or with fashion pose)
- The entire body is covered within the image. (Note: now missing legs is partially supported)
- Make sure the input image is well lit. Extremely dark or bright images and strong shadows often create artifacts.
- I recommend a nearly parallel camera angle to the ground. High camera height may result in distorted legs or high heels.
- If the background is cluttered, use a less complex background or try removing it using https://www.remove.bg/ before processing.
- It’s trained with humans only. Anime characters may not work well (To my surprise, indeed many people tried it!!).
- Search on twitter with #pifuhd tag to get a better sense of what succeeds and what fails.
We are going to search for high-resolution human pose images on google and use some of them, you can use your own image if you like.
Now that we have our sample image, let’s define paths in our notebook.import osfilename = ‘img1.png’image_path = ‘/spell/sample_images/%s’ % filenameimage_dir = os.path.dirname(image_path)file_name = os.path.splitext(os.path.basename(image_path))[0]# output pathesobj_path = ‘/spell/pifuhd/results/pifuhd_final/recon/result_%s_256.obj’ % file_nameout_img_path = ‘/spell/pifuhd/results/pifuhd_final/recon/result_%s_256.png’ % file_namevideo_path = ‘/spell/pifuhd/results/pifuhd_final/recon/result_%s_256.mp4’ % file_namevideo_display_path = ‘/spell/pifuhd/results/pifuhd_final/result_%s_256_display.mp4’ % file_name
We are using os to define our input and output file path. Once it is done, our next task is to pre-process the image to make it ready to fit in the model.
We are going to download some scripts and pre-trained models to preprocess our image data.!git clone https://github.com/Daniil-Osokin/lightweight-human-pose-estimation.pytorch.gitcd lightweight-human-pose-estimation.pytorch/!wget https://download.01.org/opencv/openvino_training_extensions/models/human_pose_estimation/checkpoint_iter_370000.pth
Our scripts are now ready to use. Let’s write a few codes to get a rectangular cropped image.import torch
import cv2
import numpy as np
from models.with_mobilenet import PoseEstimationWithMobileNet
from modules.keypoints import extract_keypoints, group_keypoints
from modules.load_state import load_state
from modules.pose import Pose, track_poses
import demodef get_rect(net, images, height_size):
net = net.eval()stride = 8
upsample_ratio = 4
num_keypoints = Pose.num_kpts
previous_poses = []
delay = 33
for image in images:
rect_path = image.replace('.%s' % (image.split('.')[-1]), '_rect.txt')
img = cv2.imread(image, cv2.IMREAD_COLOR)
orig_img = img.copy()
orig_img = img.copy()
heatmaps, pafs, scale, pad = demo.infer_fast(net, img, height_size, stride, upsample_ratio, cpu=False)total_keypoints_num = 0
all_keypoints_by_type = []
for kpt_idx in range(num_keypoints): # 19th for bg
total_keypoints_num += extract_keypoints(heatmaps[:, :, kpt_idx], all_keypoints_by_type, total_keypoints_num)pose_entries, all_keypoints = group_keypoints(all_keypoints_by_type, pafs, demo=True)
for kpt_id in range(all_keypoints.shape[0]):
all_keypoints[kpt_id, 0] = (all_keypoints[kpt_id, 0] * stride / upsample_ratio - pad[1]) / scale
all_keypoints[kpt_id, 1] = (all_keypoints[kpt_id, 1] * stride / upsample_ratio - pad[0]) / scale
current_poses = []rects = []
for n in range(len(pose_entries)):
if len(pose_entries[n]) == 0:
continue
pose_keypoints = np.ones((num_keypoints, 2), dtype=np.int32) * -1
valid_keypoints = []
for kpt_id in range(num_keypoints):
if pose_entries[n][kpt_id] != -1.0: # keypoint was found
pose_keypoints[kpt_id, 0] = int(all_keypoints[int(pose_entries[n][kpt_id]), 0])
pose_keypoints[kpt_id, 1] = int(all_keypoints[int(pose_entries[n][kpt_id]), 1])
valid_keypoints.append([pose_keypoints[kpt_id, 0], pose_keypoints[kpt_id, 1]])
valid_keypoints = np.array(valid_keypoints)
if pose_entries[n][10] != -1.0 or pose_entries[n][13] != -1.0:
pmin = valid_keypoints.min(0)
pmax = valid_keypoints.max(0)center = (0.5 * (pmax[:2] + pmin[:2])).astype(np.int)
radius = int(0.65 * max(pmax[0]-pmin[0], pmax[1]-pmin[1]))
elif pose_entries[n][10] == -1.0 and pose_entries[n][13] == -1.0 and pose_entries[n][8] != -1.0 and pose_entries[n][11] != -1.0:
# if leg is missing, use pelvis to get cropping
center = (0.5 * (pose_keypoints[8] + pose_keypoints[11])).astype(np.int)
radius = int(1.45*np.sqrt(((center[None,:] - valid_keypoints)**2).sum(1)).max(0))
center[1] += int(0.05*radius)
else:
center = np.array([img.shape[1]//2,img.shape[0]//2])
radius = max(img.shape[1]//2,img.shape[0]//2)x1 = center[0] - radius
y1 = center[1] - radiusrects.append([x1, y1, 2*radius, 2*radius])np.savetxt(rect_path, np.array(rects), fmt='%d')
Important: you have to be in the `lightweight-human-pose-estimation.pytorch` directory to be able to run this script.
Before running this we would require a pycocotools package that we have to install.!pip install pycocotools
After that, let’s pass our images to get preprocessed.net = PoseEstimationWithMobileNet()
checkpoint = torch.load(‘checkpoint_iter_370000.pth’, map_location=’cpu’)load_state(net, checkpoint)get_rect(net.cuda(), [image_path], 512)
Now we have to download the pre-trained model. We are going to use `download_trained_model` bash scripts which are already available in `pifuhd` directory. Let’s change our directory to pifuhd.cd /spell/pifuhd
Now let’s run the bash script.!sh ./scripts/download_trained_model.sh
This will download the model. After completing it, let’s run the model.!python -m apps.simple_test -r 256 — use_rect -i $image_dir
This will load the model and run it on our image.
Now our 3D model is ready, let’s render it using pytorch3D.
View Output
First, we have to install pytorch3d. This will take some time.!pip install ‘git+https://github.com/facebookresearch/pytorch3d.git@stable'
Finally, now we will require FFmpeg library to render our output video. We have to install FFmpeg using apt package management in Jupiter lab.!apt install ffmpeg -y
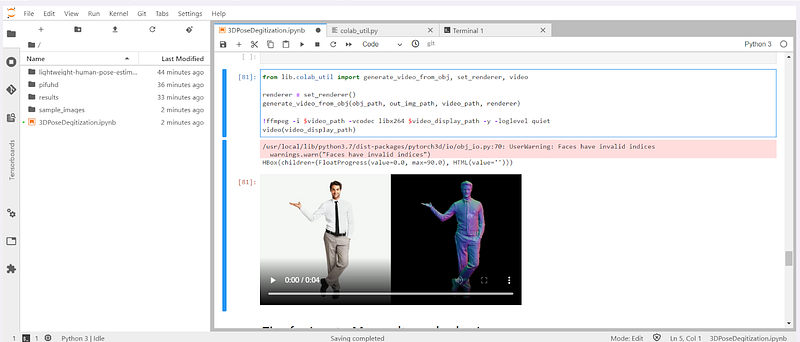
Now we can run the command below to save our 3D model video on the path that we defined earlier.from lib.colab_util import generate_video_from_obj, set_renderer, videorenderer = set_renderer()generate_video_from_obj(obj_path, out_img_path, video_path, renderer)!ffmpeg -i $video_path -vcodec libx264 $video_display_path -y -loglevel quietvideo(video_display_path)
This will generate a video for us, you can see below the results we got.

References
[Online] Shunsuke Saito, https://arxiv.org/pdf/2004.00452.pdf

Comments ()