
Building a Sentiment Classifier and monitoring the progress of training the model

Motivation
In this tutorial, we will build and train a Sentiment Classifier on Spell.ml and get deeper insights into our training metrics using the Weights and Biases (W&B).
Weights and Biases (W&B)
Weights and Biases is a platform that allows Machine Learning and Deep Learning researchers to get deep insights into their models through streamlined progress tracking, training visualization, metrics recording, and much more.
Prerequisites
Before getting started you should have a good understanding of:
- Python programming language
- PyTorch — Deep Learning Framework
Dataset
For this tutorial, we are going to use the Tweets Dataset — a collection of general tweets collected from Twitter along with their sentiment values.
Preparations
Getting the dataset ready
We are going to download our dataset file on our local machine and use pandas to get some insights into our dataset.
Note: I am using pandas directly on cmd, you can use Jupyter Notebook.

As we can see, we have two columns: Sentiment and Sentiment Text. Sentiment Text has text values and the Sentiment column has binary values.


Our dataset has 1578612 values and contains no null values and balanced data, both good signs.
With no further delay, let’s log in to Spell and upload our dataset there.
In our command line, let’s enter the following command:pip install spell
This command will install Spell CLI on our local machine.
Next:spell login
This will ask us for our Spell credentials; just enter the credentials and we are good to go.
After a successful login, we can now upload our dataset file. We’ve downloaded the tweets.csv on our local machine, so let’s upload that to Spell.
To do that, let’s head to our project folder, open a command prompt, and enter the following command:
spell upload tweets.csv
This will upload our dataset file to our desired directory on Spell.
W&B Integration on Spell
To integrate W&B on Spell, login to your Spell web dashboard and there you can find an Integration sub-menu inside Settings.
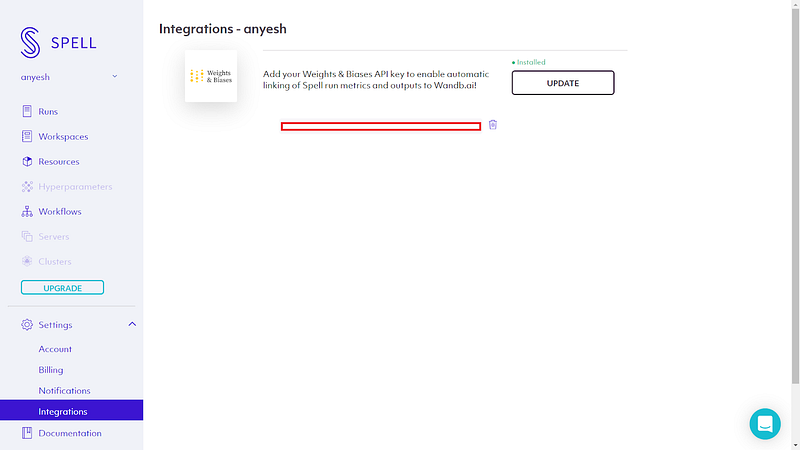
Add your W&B keys there and you are good to go.
Note: To get your W&B keys, you should have an Account registered at W&B.
Code
Before getting started with our code, let’s create proper project directories and organize our files.
We are using sentiment_classifier as our root directory.
- Sentiment_classifier
- data (here we will store our dataset)
- tweets.csv
- checkpoints — (here we will store our saved model weights)
- main.py — (main file)
- model.py — (will contain our model computation graph)
- evaluate.py — (will contain a function for model evaluation)
- test.py — (will contain a function to test our model)
- train.py — (will contain a function to train our model)
- utils.py — (will contain helper functions)
- params.py — (will contain parameters)
- preprocessing.py — (will contain code for data pre-processing)
Data Processor
As we are going to use PyTorch to develop our Classifier, there is this awesome SOTA NLP library named transformers. We are going to use the pre-trained BERT from the transformers library.
BERT, or Bidirectional Encoder Representations from Transformers, is a new method of pre-training language representations that obtains state-of-the-art results on a wide array of Natural Language Processing (NLP) tasks.
Now we have to prepare and make our data BERT and PyTorch ready.
Let’s write some code:
## dataprocessor.py
from torchtext import data
from transformers import BertTokenizer
import random
import torch
import pandas as pd
from params import *device = torch.device(‘cuda’ if torch.cuda.is_available() else ‘cpu’)
random.seed(SEED)
torch.manual_seed(SEED)
torch.backends.cudnn.deterministic = True
In the first block of our code, we are importing the required libraries for data pre-processing.
- Torchtext — To create our data generators on PyTorch way.
- BertTokenizer — To get a pre-trained BERT Tokenizer
- Random — To shuffle data
- Pandas — to read and process CSV file
- Params — our params file will contain a bunch of parameters Const like: SEED, DATA_PATH, etc. We will look into it later.
On our second block of code, we are configuring our device to work with GPU if available and setting a random seed.
We are going to use a ‘bert-base-uncased’ pre-trained model. It has 12-layer, 768-hidden, 12-heads, 110M parameters.
Let’s get that from BertTokenizer and process it:
tokenizer = BertTokenizer.from_pretrained(‘bert-base-uncased’)init_token = tokenizer.cls_token
eos_token = tokenizer.sep_token
pad_token = tokenizer.pad_token
unk_token = tokenizer.unk_tokeninit_token_idx = tokenizer.convert_tokens_to_ids(init_token)
eos_token_idx = tokenizer.convert_tokens_to_ids(eos_token)
pad_token_idx = tokenizer.convert_tokens_to_ids(pad_token)
unk_token_idx = tokenizer.convert_tokens_to_ids(unk_token)init_token_idx = tokenizer.cls_token_id
eos_token_idx = tokenizer.sep_token_id
pad_token_idx = tokenizer.pad_token_id
unk_token_idx = tokenizer.unk_token_idmax_input_length = tokenizer.max_model_input_sizes[‘bert-base-uncased’]
Here, we are getting the pre-trained model on the tokenizer variable and setting some tokens like:
- Init_token: initialization token
- Eos_token: End of statement token
- Pad_token: Padding token
- Unk_token: Unknown token
From the BERT itself, then getting their ids.
Now that we have a tokenizer and token variables, let’s write a variable to process our custom dataset in the PyTorch way.
def tokenize_and_cut(sentence):
  tokens = tokenizer.tokenize(sentence)
  tokens = tokens[:max_input_length — 2]
  return tokensTEXT = data.Field(batch_first=True,
  use_vocab=False,
  tokenize=tokenize_and_cut,
  preprocessing=tokenizer.convert_tokens_to_ids,
  init_token=init_token_idx,
  eos_token=eos_token_idx,
  pad_token=pad_token_idx,
  unk_token=unk_token_idx)LABEL = data.LabelField(dtype=torch.float)
Here we are using torchtext to process our text data and label data.
Our tweets are of type text and labels are of type float so, for our tweets data, we have created a TEXT variable with a tokenizer configured. Our TEXT field’s max length will be 512 which is the max input size of ‘bert-based-uncased’ model.
What’s great about BERT is that it uses two kinds of training strategies:
Masked LM (MLM) and Next Sentence Prediction (NSP). You can learn more about these strategies from the paper.
Classification tasks are done with NSP by adding a classification layer on top of the Transformer output for the [CLS] token.
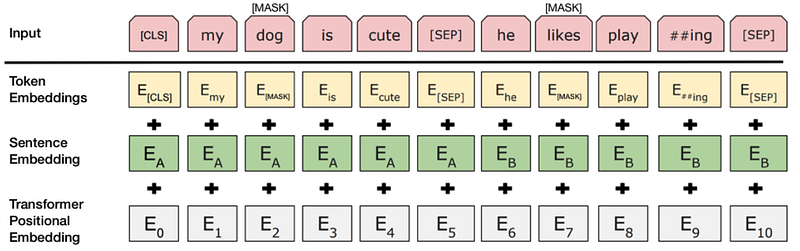
Source: BERT [Devlin et al., 2018], with modifications
Let’s look at the small example of BERT tokenization in action:
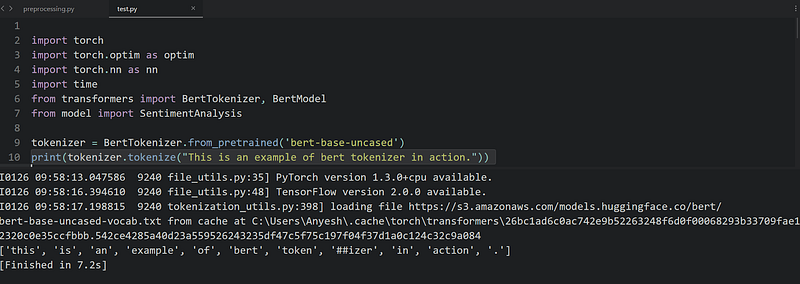
As we can see, given an input “This is an example of bert tokenizer in action.” BERT separates token and izer. BERT was trained using the WordPiece tokenization. It means that a word can be broken down into more than one sub-words. This kind of tokenization is beneficial when dealing with out-of-vocabulary words, and it may help better represent complicated words. The sub-words are constructed during the training time and depend on the corpus the model was trained on.
Now that we know how BERT works, let’s process our custom dataset:
df = pd.read_csv(f’{DATA_PATH}/tweets.csv’)
temp_train_data = df[:int(0.8 * len(df))] # 80% train
temp_train_data.to_csv(f’{DATA_PATH}/train.csv’)
temp_test_data = df[int(0.8 * len(df)):] # 20% test
temp_test_data.to_csv(f’{DATA_PATH}/test.csv’)
Here we are reading our CSV file and splitting it into a test and train set. We have allocated 80% for training and 20% for testing.
Now let’s use torchtext and convert it into a tabular dataset:
train_data = data.TabularDataset(path=f’{DATA_PATH}/train.csv’, format=’csv’, fields={
 ‘SentimentText’: (‘text’, TEXT), ‘Sentiment’: (‘labels’, LABEL)})
test_data = data.TabularDataset(path=f’{DATA_PATH}/test.csv’, format=’csv’, fields={
 ‘SentimentText’: (‘text’, TEXT), ‘Sentiment’: (‘labels’, LABEL)})
train_data, valid_data = train_data.split(random_state=random.seed(SEED))
Here we are processing our train and test CSV files with the TEXT and LABEL variable that we’ve created earlier and again splitting the train set into training and validation sets.
Now that we’ve processed our dataset, let’s build a vocab for training data and create iterators:
# Building vocab
LABEL.build_vocab(train_data)# Building iterator
train_iterator, valid_iterator, test_iterator = data.BucketIterator.splits(
 (train_data, valid_data, test_data),
 batch_size=BATCH_SIZE,
 device=device,
 sort=False,
 sort_within_batch=False,
 repeat=False)
Utils
Our utils.py file has some helper functions:
## utils.py
import torch

def binary_accuracy(preds, y):
    “””
    Returns accuracy per batch, i.e. if you get 8/10 right, this returns 0.8, NOT 8
    “””# round predictions to the closest integer
    rounded_preds = torch.round(torch.sigmoid(preds))
    correct = (rounded_preds == y).float() # convert into float for division
    acc = correct.sum() / len(correct)
    return accdef epoch_time(start_time, end_time):
    elapsed_time = end_time — start_time
    elapsed_mins = int(elapsed_time / 60)
    elapsed_secs = int(elapsed_time — (elapsed_mins * 60))
    return elapsed_mins, elapsed_secs
Params
As discussed earlier, our params.py file contains all our parameters and variables:
## params.py

HIDDEN_DIM = 256
OUTPUT_DIM = 1
N_LAYERS = 2
BIDIRECTIONAL = True
DROPOUT = 0.25
BATCH_SIZE = 128
validation_split = .2
random_seed = 42
shuffle_dataset = True
N_EPOCHS = 5
BATCH_SIZE = 128
SEED = 0
DATA_PATH = “/spell/sentiment_classifier”
There are several other ways to set const variables but we are using this approach. It helps us to tune our hyperparameters and other variables easily.
Model
Now that we have processed our data, let’s create our classification model:
## model.py

import torch.nn as nn
import torchclass

SentimentClassifier(nn.Module):
 def __init__(self,
   bert,
   hidden_dim,
   output_dim,
   n_layers,
   bidirectional,
   dropout,
 ):
   super().__init__()self.bert = bert
   embedding_dim = bert.config.to_dict()[‘hidden_size’]
   self.rnn = nn.GRU(
     embedding_dim,
     hidden_dim,
     num_layers=n_layers,
     bidirectional=bidirectional,
     batch_first=True,
     dropout=0 if n_layers < 2 else dropout
    )
    self.out = nn.Linear(
       hidden_dim * 2 if bidirectional else hidden_dim,
       output_dim
       )
    self.dropout = nn.Dropout(dropout)

  def forward(self, text):
    # text = [batch size, sent len]
    with torch.no_grad():
       embedded = self.bert(text)[0]
       # embedded = [batch size, sent len, emb dim]
       _, hidden = self.rnn(embedded)
       # hidden = [n layers * n directions, batch size, emb dim]
       if self.rnn.bidirectional:
           hidden = self.dropout(
             torch.cat((hidden[-2, :, :], hidden[-1, :, :]), dim=1))
       else:
           hidden = self.dropout(hidden[-1, :, :])
           # hidden = [batch size, hid dim]
           output = self.out(hidden)
           # output = [batch size, out dim]return output
Our SentimentClassifier model inherits pytorch’s nn.module. It takes bert, hidden_dim, output_dim, n_layers, bidirectional, and dropout as input.

Our computation graph architecture looks like this.
We have a BERT layer on top and we are using Bidirectional GRU as our RNN layer with dropout and a linear output layer.
As BERT is a pre-trained layer, we are not going to re-train those parameters. Later while training, we will set the config for that.
Train
Now that we have prepared our model architecture, let’s write code for our train.py file:
## train.py

from barbar import Bar
from utils import binary_accuracy

def train(model, iterator, optimizer, criterion):
  epoch_loss = 0
  epoch_acc = 0
  model.train()
  for idx, (text, label) in enumerate(Bar(iterator)):
    optimizer.zero_grad()
    predictions = model(text).squeeze(1)
    loss = criterion(predictions, label)
    acc = binary_accuracy(predictions, label)
    loss.backward()
    optimizer.step()
    epoch_loss += loss.item()
      epoch_acc += acc.item()
  return epoch_loss / len(iterator), epoch_acc / len(iterator)
Our train.py file has a function that takes model, iterators, optimizer, and criterion as inputs and returns loss and accuracy metrics as outputs.
Evaluate
Our evaluate.py file will also be similar to the train.py file:
## evaluate.py

import torch
from utils import binary_accuracy
from barbar import Bar

def evaluate(model, iterator, criterion):
  epoch_loss = 0
  epoch_acc = 0
  model.eval()
  with torch.no_grad():
    for idx, (text, label) in enumerate(Bar(iterator)):
      predictions = model(text).squeeze(1)
      loss = criterion(predictions, label)
      acc = binary_accuracy(predictions, label)
      epoch_loss += loss.item()
      epoch_acc += acc.item()
  return epoch_loss / len(iterator), epoch_acc / len(iterator)
It takes model, iterator, and criterion as inputs and outputs loss and accuracy. This function is used to evaluate how well our model is performing.
Main
Now it’s time to write our main.py file.
First of all, let’s import all the required classes, functions, and variables:
## main.py

import torch
import torch.optim as optim
import torch.nn as nn
import time
from utils import epoch_time
from train import train
from evaluate import evaluate
from model import SentimentClassifier
from preprocessing import train_iterator, valid_iterator
import wandb
from params import *
from transformers import BertModel
We will require our SentimentClassifier model — which we designed earlier — and our iterators with all the parameters.
We will also import wandb here. We will be configuring our WandB here.
wandb.init(config={"epochs" N_EPOCHS, "batch_size" BATCH_SIZE, “dropout”: DROPOUT})Here we are initializing wandb with a few configs.
device = torch.device(‘cuda’ if torch.cuda.is_available() else ‘cpu’)
bert = BertModel.from_pretrained(‘bert-base-uncased’)
model = SentimentClassifier(bert,
 HIDDEN_DIM,
 OUTPUT_DIM,
 N_LAYERS,
 BIDIRECTIONAL,
 DROPOUT)optimizer = optim.Adam(model.parameters())
criterion = nn.BCEWithLogitsLoss()
After that, we are setting our device for Cuda if GPU is available and then we are setting our ‘bert-base-uncased’ model. We are then passing that bert to our SentimentClassifier with a bunch of other required parameters.
Now that we have our model ready, we are setting an Adam optimizer and a Binary Cross Entropy Log Loss as our criterion.
Now let’s set our model and criterion to an available device:
model = model.to(device)
criterion = criterion.to(device)
After that, let’s write our code to not train the bert model’s parameters:
for name, param in model.named_parameters():
 if name.startswith(‘bert’):
   param.requires_grad = False
Now let’s set our model to be monitored by wandb by using wandb.watch() function.
wandb.watch(model)
Now that we have everything ready, let’s set our model to train on given epochs:
best_valid_loss = float('inf')
for epoch in range(N_EPOCHS):
start_time = time.time()
train_loss, train_acc = train(model, train_iterator, optimizer, criterion)
valid_loss, valid_acc = evaluate(model, valid_iterator, criterion)
end_time = time.time()
epoch_mins, epoch_secs = epoch_time(start_time, end_time)
if valid_loss < best_valid_loss:
best_valid_loss = valid_loss
torch.save(model.state_dict(), ‘sentiment_classifier.pt’)
print(f’Epoch: {epoch+1:02} | Epoch Time: {epoch_mins}m {epoch_secs}s’)
print(f’\tTrain Loss: {train_loss:.3f} | Train Acc: {train_acc*100:.2f}%’)
print(f’\t Val. Loss: {valid_loss:.3f} | Val. Acc: {valid_acc*100:.2f}%’)
wandb.log({
“Epoch”: epoch + 1,
“Epoch Time”: “f{epoch_mins}m {epoch_secs}s”,
“Train Loss”: train_loss,
“Train Accuracy”: train_acc * 100,
“Validation Loss”: valid_loss,
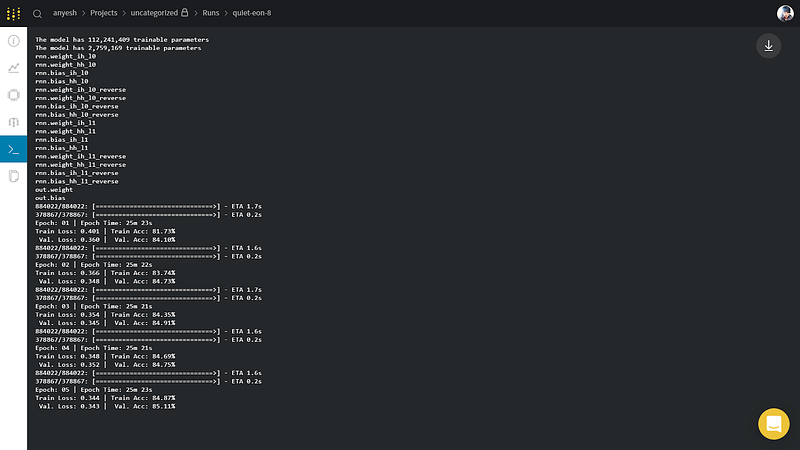
“Validation Accuracy”: valid_acc * 100,})We have our number of epochs set to 5 (N_EPOCH=5) and on every epoch, we are passing our train and valid iterator with a criterion to our train and evaluate function.
After that, we are logging the time taken to finish the epoch, with train and validation metrics, and saving the model on each checkpoint.
wandb.log() function will log our metrics so that we can see that on our wandb dashboard.
Train on Spell
Now that we have written all our code, it’s time to train it on Spell.
Let’s push our code on GitHub so that we can easily train our model on Spell’s run.
After pushing our code on GitHub, let’s write command to train our model on Spell.
spell run — machine-type V100 — pip barbar — pip pillow — pip torch — pip torchtext — pip transformers — mount uploads/sentiment_classifier:/spell/sentiment_classifier ‘python main.py’
Here we are mounting our dataset folder which we’ve created earlier to spell/sentiment_classifier. It’s very important to set this path on our params.py file to locate our dataset file.
Other configurations we are using include the V100 GPU machine as well as setting torch, torchtext, and transformers as pip requirements and running our main.py file.
That’s everything we need to do! Now, our model will train on Spell and we can monitor different metrics on Spell’s web dashboard. In addition, we will also get a wandb link to view the insights of our model on wandb directly.How cool is that?
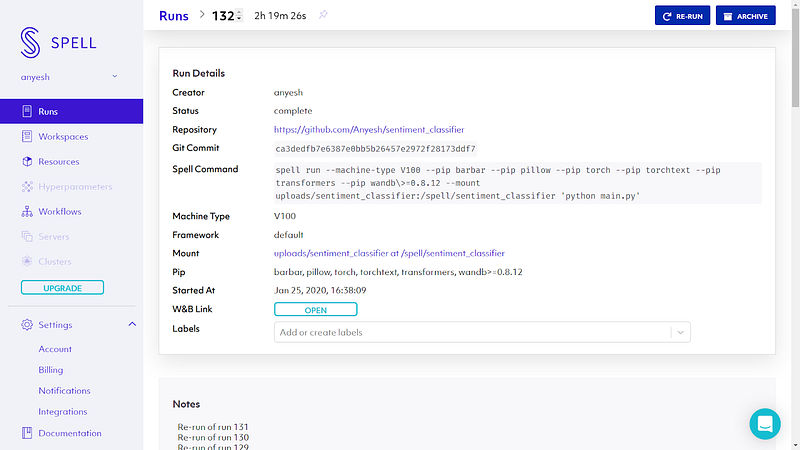
We can click on W&B Link button and we will be redirected to the wandb dashboard.
W&B
Once we get redirected on the wandb dashboard, we can see the Overview of our model.
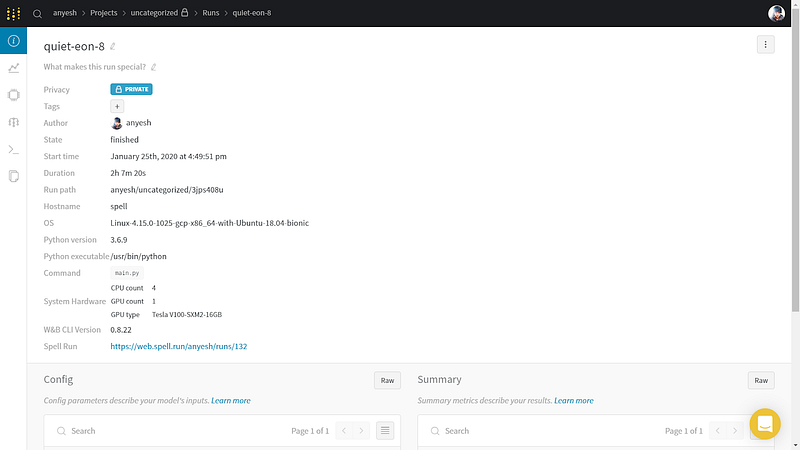
As we can see, it contains an overview of our run.
After that, there is a Charts tab where we can visualize our model metrics like training and validation loss, accuracy, and gradients that were automatically generated by wandb.
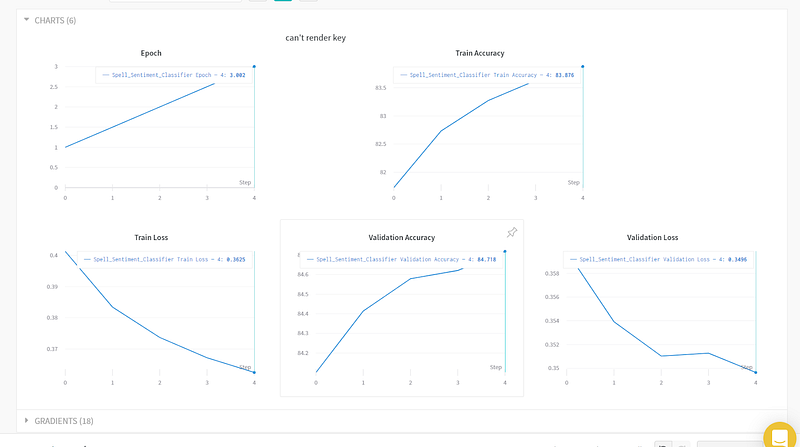
Since we have only trained our model on 5 epochs, our chart is not very interesting, but it is very helpful.
As you can see, we have a validation accuracy of 85% and a validation loss of 0.3%, which is pretty good.
We can also visualize our system usage with other logs.
Testing
Now that we have finished our training and evaluation, let’s test our model.
You can download your saved model from Spell locally.
Let’s write a small section of code to test our model:
## test.pyimport torch
import torch.optim as optim
import torch.nn as nn
import time
from transformers import BertTokenizer, BertModel
from model import SentimentClassifiertokenizer = BertTokenizer.from_pretrained(‘bert-base-uncased’)
max_input_length = tokenizer.max_model_input_sizes[‘bert-base-uncased’]init_token = tokenizer.cls_token
eos_token = tokenizer.sep_token
pad_token = tokenizer.pad_token
unk_token = tokenizer.unk_token
init_token_idx = tokenizer.convert_tokens_to_ids(init_token)
eos_token_idx = tokenizer.convert_tokens_to_ids(eos_token)
pad_token_idx = tokenizer.convert_tokens_to_ids(pad_token)
unk_token_idx = tokenizer.convert_tokens_to_ids(unk_token)
init_token_idx = tokenizer.cls_token_id
eos_token_idx = tokenizer.sep_token_id
pad_token_idx = tokenizer.pad_token_id
unk_token_idx = tokenizer.unk_token_id

bert = BertModel.from_pretrained(‘bert-base-uncased’)

device = torch.device(‘cuda’ if torch.cuda.is_available() else ‘cpu’)

model = SentimentClassifier(bert,
 HIDDEN_DIM,
 OUTPUT_DIM,
 N_LAYERS,
 BIDIRECTIONAL,
 DROPOUT)model = model.to(device)
model.load_state_dict(torch.load(
 ‘./checkpoints/sentiment_classifier.pt’, map_location=torch.device(‘cpu’)))

 def predict_sentiment(model, tokenizer, sentence):
   model.eval()
   tokens = tokenizer.tokenize(sentence)
   tokens = tokens[:max_input_length — 2]
   indexed = [init_token_idx] + \
   tokenizer.convert_tokens_to_ids(tokens) + [eos_token_idx]
   tensor = torch.LongTensor(indexed).to(device)
   tensor = tensor.unsqueeze(0)
   prediction = torch.sigmoid(model(tensor))
   return prediction.item()
Here all the codes are similar to previous except we are loading our model and setting its weights to our saved weights.
And we have our predict_sentiment function which gives a prediction output of 0 or 1.
Let’s test it on some general examples:


References
[1] Devlin, J., Chang, M. W., Lee, K., & Toutanova, K. (2018). Bert: Pre-training of deep bidirectional transformers for language understanding. arXiv preprint arXiv:1810.04805.
[2] Bentrevett, 2019, Pytorch Sentiment Analysis [Online]
Here is a GitHub link for this project with a simple flask app web demo. Train the model on Spell and once the model is ready, you can download and run it on your local machine or a web platform.
For any queries and discussion, you can join the Spell community from here: https://chat.spell.ml/

Comments ()